Yes, we love dogs.
And this post has nothing to do with dogs or woof. We wish though.
This post is about the numerous benefits of interview transcription.
And how you can transcribe your interviews yourself.
This is also one of the most complete guides on this topic on the internet.
Table of Contents
- What is Interview Transcription?
- How to Record Interviews for Best Results
- How to Transcribe Interviews Yourself
- Benefits of Interview Transcription
What is Interview Transcription?
In simple terms, it is the process of converting an audio or video interview into text.
Why is it beneficial? It is much easier to find what you’re looking for in a block of text compared to recorded audio or video.
Especially if your interview is long.
Whether you are a:
- PhD Candidate
- Student
- Lecturer
- Podcaster
- YouTuber
- Serial Procrastinator
- Gollum Impersonator, etc.
Interview transcription can benefit you in many ways.
It has long been the standard and most common data management strategy in qualitative research.
Furthermore, it is widely considered to be one of the best tools for analysis and interpretation of data.
Interviews are being used increasingly as a tool for collecting information for various purposes such as health issues, education, social issues etc.
Interview transcripts can also be used as a source for subtitles, or to use on your website for SEO benefits.
How to Record Interviews for Best Results
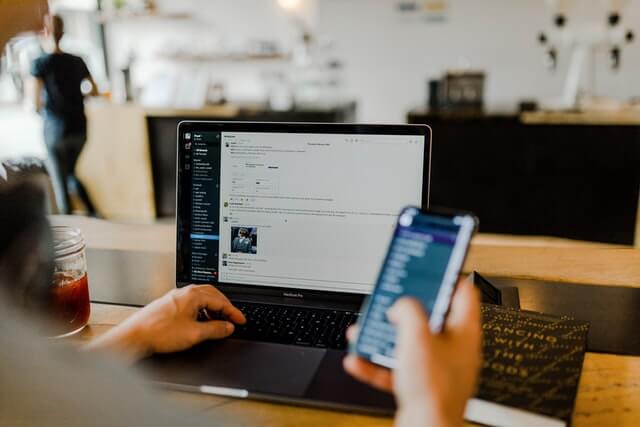
With social distancing rules in place (at the time of writing), the above picture is probably a true representation of how you will be recording interviews in 2020.
Let’s be honest, if you’ve recorded your interview with tons of background noise or other disturbances, it will make interview transcription that much more difficult.
Below are a couple of reasons why:
- You will spend more time and effort transcribing bad quality audio.
- If you hire a freelance transcriber, they may make mistakes which you’ll have to correct later.
- A transcription services company may charge you extra for difficult audio.
- Difficult audio can lead to inaccuracies in data, which will affect your outcome.
- You may have to waste time recording the interview again if it’s really bad.
To avoid the above from happening, we’ve created a couple of helpful, in-depth guides like:
- How to Record Audio for Best Sound Quality
- How to Record an Interview From Home in 2020
- 5 Ways to Record Better Focus Group Interviews
If you can’t be bothered to read all of those guides, below are some brief steps:
1. Choose a Quiet Place to Record Your Interview
No, not the horror movie on Netflix.
But a quiet place like a silent room, corner bench at a park away from the screaming kids.
Avoid busy restaurants and coffee shops.
2. Keep the Microphone Closest to the Main Speaker
If the participant in your interview is going to do most of the talking, or if their viewpoints are the most important, it’s a good idea to keep the microphone closest to them.
It makes no sense to keep it closer to yourself. You already have your list of questions.
3. Give Clear Instructions to Participants
You might think people don’t need to be told about basic interview etiquette, and you will be surprised.
It’s better to be safe than sorry.
If there are multiple participants in your interview, ask them not to talk over each other, wait for their turn, enunciate etc.
4. Do a Trial Run
It never hurts to do a mock/test recording beforehand to make sure everything works.
This also helps you to get used to the digital recorder or smartphone app you plan on using.
You don’t want to conduct a 2 hour interview, only to find out your recorder wasn’t recording that whole time. Oh, the horror!
How to Transcribe Interviews Yourself

It’s literally as easy as listening to audio and typing in a document.
Having said that, it can be time consuming.
However, by using a couple of tips and tricks you can cut down on time spent on interview transcription massively.
We’ve done extensive guides on this topic in the past, like:
If you don’t have the time to read those detailed guides, here are a couple of steps in brief:
1. Download and Install a Transcription Playback Software
We recommend Express Scribe. It is one of the most widely used transcription playback software available.
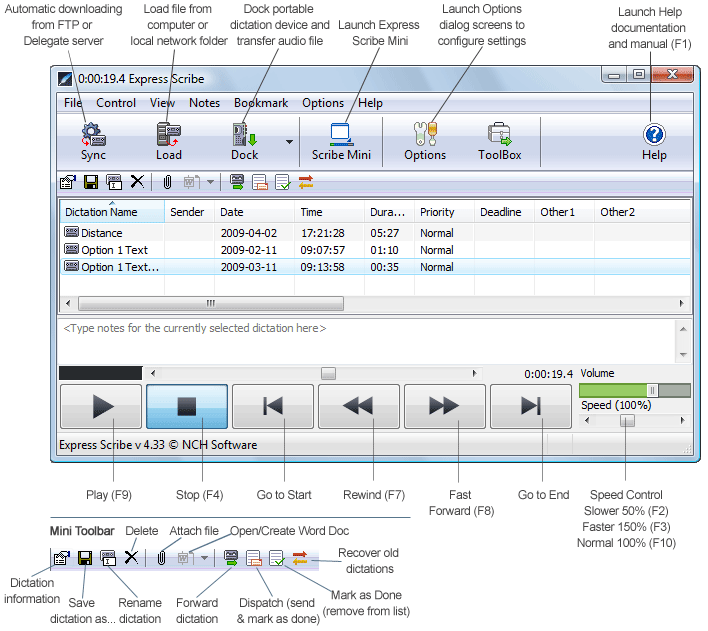
Please note that it won’t automatically transcribe your files, but help you to have better playback control for interview transcription.
For a detailed guide, please see below:
2. Download and Install a Word Processing Software
You can type in a notepad or any free text tool that comes with your computer.
However, for best results when it comes to formatting, grammar, spell check etc. we recommend installing a word processing software.
- Best Free Word Processor: OpenOffice
- Best Paid Word Processor: Microsoft Word
3. Get a Good Pair of Headphones
Please don’t transcribe using your laptop speakers. *shivers*
A good quality pair of in-ear or over-the-ear headphones can make a huge difference in:
- How easy interview transcription is for you.
- The quality of your transcript.
- If the experience is enjoyable or annoying.
- Maybe even the outcome of your research project.
In our experience in-ear headphones or “earbuds” are better because they deliver crisp, clean sound and isolate external sound better as well.
Plus if you’re going to be sitting long hours, on-ear or over-the-ear cupped headphones can be uncomfortable and sweaty, especially during summers.
A couple of audiophile high quality earbuds we recommend are:
- Sony MDRXB50AP – $30.92 on Amazon.com
- Sennheiser CX 300S – $49.95 on Amazon.com
- Shure SE215-CL – $95.60 on Amazon.com
There are cheaper options available on Amazon and other stores, especially from Sony and Panasonic, for around $10 to $15.
They won’t be as high quality, but should still get the job done.
4. Use Software Shortcuts to Save Time
You don’t have to go overboard. Just by using a couple of simple keyboard shortcuts, you can save yourself a TON of time and speed up the process of interview transcription.
Complete list of keyboard shortcuts for MS Word:
Microsoft Word Keyboard Shortcuts
Another useful feature is to add highlighted time stamps or time codes in your transcripts.
If you keep getting stuck on difficult words, and have to constantly rewind the interview, time stamps can be a godsend.
Because you copy the exact time for the difficult word from the audio/video interview and paste it in the transcript.
This way once you’re done transcribing, you can jump to and review only the time stamps instead of the entire transcript.
This is especially useful if you still got stuck on some words even after proofreading the entire transcript.
This can be done easily using a transcription playback software like Express Scribe.
We’ve done a guide on it, link below:
How to add Time Stamps using Express Scribe
Click here and scroll to the section titled “How to Use Express Scribe to Add Time Stamps?”
5. Hone and Refine Your Typing Skills and Speed
There are tons of free typing tests online. Just Google them, or take a look at some recommendations below:
6. Listen to the Interview Before you Begin Transcription
Even if you recorded the interviews yourself, it’s a good idea to give them a quick listen before you begin transcribing, to understand what lies ahead.
You don’t want to waste time trying to transcribe something that you will eventually give to a transcription service because it was too difficult.
This is also helpful to ascertain the audio quality, to determine whether you could use a transcription speech recognition software for automatic machine transcription.
Or if it’s easy enough, so that you can transcribe it yourself on a laptop with minimal equipment.
7. Learn to do Better Online Research
If you’re the one who recorded the interview, you already know all the information there is to know about the subject topic.
But if not, it’s a good idea to do proper research on search engines like Google, Bing etc. before you begin.
8. Understand how long Interview Transcription takes
If you’re not an experienced transcriber, and you’re not using any specialized equipment.
Just some headphones and a standard keyboard.
It can take you between 6-8 hours to transcribe an interview that’s 60 minutes long.
More difficult audio files with multiple speakers, technical jargon that requires research, background noise etc. can take close to 10 or 12 hours for the same audio duration i.e. 60 minutes.
If you’re a complete newbie, it can take you 24 hours to transcribe the same audio length that it takes an experienced transcriber somewhere around 5-6 hours.
As a rule of thumb, you will transcribe 5-10 minutes per hour if you’re really “on it.”
Yes, interview transcription is time consuming.
However PLEASE NOTE: You can cut down on transcription time massively by using a transcription foot pedal.
Which brings us to the next point.
9. Buy a Transcription Foot Pedal if You’re Going to do this Often
In our experience, this is one of the biggest difference makers when it comes to saving time.
It will cut your interview transcription time in half.
How? It’s a foot pedal that connects to your computer via USB, and your feet control playback, so your hands are free to type.
Without this, you will constantly interrupt your typing hands to control playback using the function keys on your keybord.
The video below does a good job of visually representing how it works:
We recommend the VEC Infinity transcription foot pedal (available on Amazon).
The reason we recommend that specific model is because it is ridiculously easy to set up.
And it works out-of-the-box with a transcription playback software like Express Scribe, settings screenshot below:
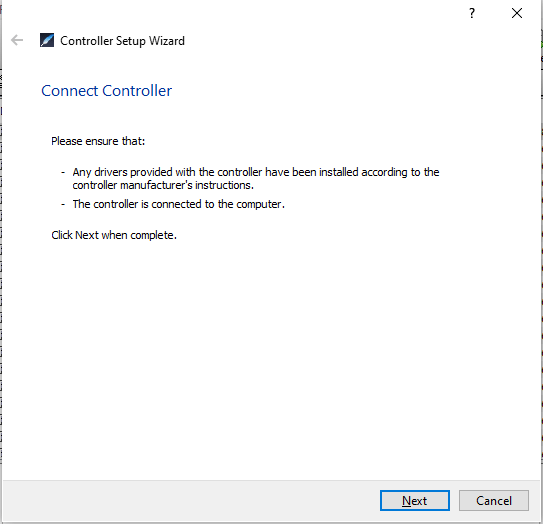
All you need to do is launch Express Scribe, click on Options -> Controller, plug in the foot pedal and click “Next”.
And voila, it’s all set up.
The big clickable button in the middle is usually used to play and pause, and the two smaller ones on either side for the rewind and forward function.
But you can assign those buttons to any function you like.
10. Improve your Language and Accent Comprehension
If your interview participants are from around the world with different accents, and you’re having trouble understanding any of them, it’d be a good idea to do a quick search on YouTube.
There are lots of accent and dialect coaches who will make it very easy for you to understand difficult accents or fast speakers.
One such example is:
If you’re looking at interview transcription as a career, and you’re not a native English speaker, do not be discouraged.
Simply by watching movies and series from different parts of the world with subtitles, like for ex. on Netflix, can help you to get used to different accents in a short period of time.
11. Practice makes Perfect
Just like with anything else in life, transcription too is an acquired skill.
The more you practice, the faster and better you become.
12. Be Comfortable
Transcription requires sitting for long hours, so we recommend ergonomic chairs to support your lower back.
A good rule of thumb is to get up every 20-30 minutes and stretch your spine and walk around a bit.
13. Get Plenty of Sleep
Transcription requires immense focus and concentration.
And you can’t focus very well on just 4 hours of sleep.
What if You Don’t Have the Time or Inclination?
You can:
- Use a Transcription Speech Recognition Software
- Hire a Freelance Transcriber
- Outsource to a Transcription Services Company
Benefits of Interview Transcription
In Market Research
- Interview transcripts are a great tool for data analysis and management.
- They serve as easily readable, searchable documents.
- Accurate interview transcripts can save a lot of time.
- Time saved = money and effort saved.
- Saved time and money can greatly affect the outcome of a market research study.
- Enables researchers to track the topic.
- Interview transcripts offer a range of framework that affects the way an interviewer sees the data.
- Having a script of data helps in paying much more attention to a set of answers.
In PhD Qualitative Research
- Interview transcription makes it easier for teams to collaborate, especially for longitudinal studies.
- They speed up interpretation of data for academic transcription.
- Transcripts are only a few kilobytes, compared to audio and video files, which can be megabytes or gigabytes.
- Small file size means they can be shared easily, on top of being easier and faster to analyze.
- It provides detailed examination of the events of the interaction.
- Enables fellow researchers to have direct and quick access to data.
- Data can be reused in other investigations and can be reexamined in the context of new findings.
- Extends the range and precision of observations that can be made.
- Provides a source of reference for the interviewer while conducting a follow up interview.
- Data can be published in the form of thesis or articles for completion of a dissertation.
For YouTubers and Podcasters
- Interview transcripts helps you to reach and help more viewers.
- Close to 500 million people worldwide have disabling hearing loss.
- 85% of Facebook videos are watched on mute.
- Interview transcripts can help you increase podcast listeners
- They can be used as a source for subtitles.
- Most people prefer subtitles on videos.
- It’s an easy way to manage data for future look-ups and revisions.
- Interview transcripts provide SEO benefits and boost your Google ranking.
Thanks for reading this guide.
If you liked it, please let us know below in the comments.
If you have any ideas on how we can improve this guide further, please let us know below as well.
If you would like help with transcribing your interviews, we can help.

Leave A Comment